Enhancing Your Outdoor Space: Learn how to upgrade your outdoor area with these essential tips. Start by choosing the right materials and creating a sturdy base. Ensure proper drainage and grasp key concepts for success. Gather tools like a measuring tape, rubber mallet, and level. Clear the area, level the ground, and establish a solid foundation. Follow a step-by-step guide to lay stones and add the finishing touches for a stylish result. Maintain your patio by sweeping debris, hosing off dirt, and applying sealant. Discover expert tips to effortlessly create a stunning outdoor oasis.
Key Takeaways
- Choose high-quality materials for durability and aesthetics.
- Properly prepare the base for a stable foundation.
- Ensure good drainage to prevent water accumulation.
- Pay attention to detail for a polished finish.
- Regular maintenance like sweeping and sealing is essential.
Understanding DIY Paver Installation
Understanding the intricacies of DIY paver installation tips is essential for creating a durable and visually appealing patio space. From choosing the appropriate materials to preparing the base and ensuring proper drainage, each step plays a crucial role in the longevity and aesthetics of your patio. By grasping these key concepts, you can start on your project with confidence, knowing you are on the way to a stunning outdoor oasis.
Essential Tools for Paver Installation
When starting on a paver installation project, equipping yourself with the necessary tools is vital to guarantee a smooth and successful patio construction process. Key tools for paver installation include a measuring tape for accurate dimensions, a rubber mallet to make sure of proper alignment, a shovel for excavation, a level to maintain evenness, and a brush for finishing touches. Having these tools on hand will make your DIY project efficient and satisfying.
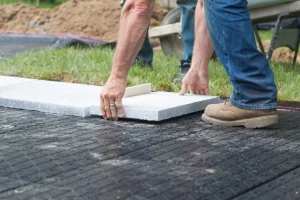
Preparing Your Patio for Pavers
Before laying down your pavers, thorough preparation of your patio surface is essential to guarantee a long-lasting and visually appealing end result. Begin by clearing the area of any debris, weeds, and existing paving. Make sure the ground is level and compacted to provide a stable foundation for your pavers. Proper preparation sets the stage for a successful DIY paver installation project that improves your outdoor space.
Step-by-Step Paver Installation Guide
Embarking on a comprehensive exploration through the intricacies of paver installation transforms your outdoor area into a visually stunning oasis of style and functionality. Each step in the paver installation process plays an essential role in ensuring a durable and aesthetically pleasing patio. From preparing the base and laying the pavers to adding finishing touches, following a detailed guide will result in a beautifully crafted outdoor space.
Tips for Maintaining a Stylish Patio
Consistently maintaining your patio is crucial to preserving its stylish appearance and functionality over time. Regularly sweep debris, hose off dirt, and remove stains quickly to maintain the pavers’ aesthetic appeal. Apply a sealant to protect against weather damage and prevent color fading. Trim surrounding plants to prevent overgrowth, ensuring a neat and inviting outdoor space for relaxation and entertainment.
Frequently Asked Questions
Can I Use Pavers to Create Different Patterns or Designs in My Patio?
Pavers offer a versatile option for creating unique patterns and designs on your patio. With various shapes, colors, and laying techniques, you can achieve elaborate layouts like herringbone, basketweave, or running bond, adding a stylish touch to your outdoor space.
How Do I Ensure Proper Drainage When Installing Pavers in My Outdoor Space?
Proper drainage is vital when laying pavers in your outdoor area. Guarantee a slight incline away from structures to guide water flow. Use a geotextile fabric to deter soil erosion and contemplate adding a gravel base for enhanced water dispersion.
Are There Any Special Considerations for Installing Pavers on Uneven Ground?
Special considerations for installing pavers on uneven ground involve proper leveling techniques, such as using sand or gravel base layers, to e stability and prevent shifting. Also, consider using retaining walls or edging for added support and aesthetic appeal.
What Are Some Creative Ways to Incorporate Pavers Into My Outdoor Space Beyond Just a Traditional Patio?
Incorporate bricks imaginatively by designing walkways, borders, or focal points like fire pits or seating areas. Experiment with patterns, colors, and textures to enhance your outdoor space. Consider using bricks for unique features that complement your landscaping.
How Can I Prevent Weeds From Growing Between My Pavers and Maintain a Clean Look in My Patio?
To prevent weed growth between pavers and maintain a tidy patio, consider laying a geotextile fabric or polymeric sand beneath the pavers. Regularly apply a weed killer, inspect for any growth, and address expeditiously. Proper installation and maintenance are key.
Conclusion
Elevating the art of DIY paver installation is a fulfilling journey that can enhance your outdoor space with style and functionality. By following the expert tips and techniques outlined in this guide, you can create a mesmerizing patio that reflects your unique design aesthetic. From selecting the right materials to laying pavers with precision, you have the knowledge and insights to commence on this transformative project with confidence. Embrace creativity and craftsmanship as you craft your dream outdoor sanctuary.
You may also love: Basics of Residential Designer Window Installation